well, hi!
isn't this season wonderful? everything tastes wonderful, smells divine, is adorable or beautiful to look at....
we've been busy and laid back all at once. just when we're tempted to feel so overwhelmed, there's an evening at home with a fire roaring and Christmas lights twinkling and Rudolph on tv. ahh.
some lovelies around my house...
the prize i won at a Christmas party. LOVE those little signs. gonna put it in the bathroom to remind myself that bathtime isn't torture. i will miss it. someday.
one of the many vintage santas around here.
this is simmering on the fireplace or the stove lately. smells soooo good. cloves, oranges, cinnamon sticks and cranberries. thank you, calli at make it do for the recipe.
so many shiny ornaments i resorted to just clustering them and hanging them around. beautiful!
more santas. i like Austrian Santa best.
oh dear. trouble in a bag. peppermint puppy chow, from sally's baking addiction. yummmmy.
a pile of delicious smelling goat's milk soaps for gifts. or maybe to keep. hmm.
wreath inspired by thompson family blog. nativity minus a wise man, plus a little tikes sheep. bookshelf painted with homemade chalk paint. this cheerful corner makes me happy!
we're busy but it's good. hope you are enjoying these HAPPY holidays.
Showing posts with label crafts. Show all posts
Wednesday, December 12, 2012
Friday, November 9, 2012
project lately: burlap wreath
just thought i would pop in and show my morning project for you...
nothing special- in fact, these burlap wreaths are all over right now. i love them! they are so classy and rugged and EASY!
i only wanted to share some tips because when i was looking for a tutorial, (which there are many and they are good!) they all said the same thing- just weave your burlap in and out and fluff up your loops. which is EXACTLY what you do- but i was still clueless. that seemed so vague and directionless! so after making a few, i wanted to post some tips in case you need a little more guidance getting started.
one thing i wished someone would have stated in their tutorials also is that burlap STINKS and is super messy. so don't wear a black cashmere sweater and you should probably do this project outside! seriously, what do they use to make burlap rolls- seems a little toxic?? anyhow. moving on.
start with your supplies: a roll or rolls of burlap (mine took about 10 yards total), scissors and a wreath form. [i also used some chevron fabric to gussy it up a bit at the end. and i thought i would need the twine but didn't.]
one thing that helped me a BUNCH was to take my burlap, unroll the whole thing and cut it into thirds. each is still long-10 feet- but this made weaving much more manageable.
start with one end of your burlap, knot it onto your wreath form on the inner rung. it won't show.
now take that long tail of that piece of burlap and pull it through the middle space. then make a little figure 8 and weave the tail through the middle section again.
that's all it is- but it took me AGES to get the hang of it. don't worry about the burlap being twisted or scrunched up- adds character! every so often, loop through the first rung instead of the middle. just weave, making figure 8's as you go along.
{you can see my ghetto photo-editing here with the turquoise arrow guiding you through the second part of the figure 8. it's real bad.}
i tried to make about 5 or 6 loops per section of the wreath and used one of my long 10 foot pieces about 3 sections. nothing exact. when i finished with a piece, i just tucked it in securely somewhere and started again with a new long burlap strip. i knotted each new strip but i think tucking would work just as well.
helps to have your old handsome dog giving support.
there she is! really quick project. i love that is can be changed out easily- glitter snowflakes, silk flowers, peacock feathers, an initial.... endless possibilities.
i used that chevron fabric to stick in a few loops here and there. not even secured very well- i can pull them right out when i'm ready to update for Christmas. (which i totally am already, but restraining until after turkey day....)
i need to be sure to thank my supporting cast members who all diligently gathered around and got under my feet and all twisted up in burlap. thanks for letting me indulge in a quick project, everyone....
nothing special- in fact, these burlap wreaths are all over right now. i love them! they are so classy and rugged and EASY!
i only wanted to share some tips because when i was looking for a tutorial, (which there are many and they are good!) they all said the same thing- just weave your burlap in and out and fluff up your loops. which is EXACTLY what you do- but i was still clueless. that seemed so vague and directionless! so after making a few, i wanted to post some tips in case you need a little more guidance getting started.
one thing i wished someone would have stated in their tutorials also is that burlap STINKS and is super messy. so don't wear a black cashmere sweater and you should probably do this project outside! seriously, what do they use to make burlap rolls- seems a little toxic?? anyhow. moving on.
start with your supplies: a roll or rolls of burlap (mine took about 10 yards total), scissors and a wreath form. [i also used some chevron fabric to gussy it up a bit at the end. and i thought i would need the twine but didn't.]
one thing that helped me a BUNCH was to take my burlap, unroll the whole thing and cut it into thirds. each is still long-10 feet- but this made weaving much more manageable.
start with one end of your burlap, knot it onto your wreath form on the inner rung. it won't show.
now take that long tail of that piece of burlap and pull it through the middle space. then make a little figure 8 and weave the tail through the middle section again.
that's all it is- but it took me AGES to get the hang of it. don't worry about the burlap being twisted or scrunched up- adds character! every so often, loop through the first rung instead of the middle. just weave, making figure 8's as you go along.
{you can see my ghetto photo-editing here with the turquoise arrow guiding you through the second part of the figure 8. it's real bad.}
i tried to make about 5 or 6 loops per section of the wreath and used one of my long 10 foot pieces about 3 sections. nothing exact. when i finished with a piece, i just tucked it in securely somewhere and started again with a new long burlap strip. i knotted each new strip but i think tucking would work just as well.
helps to have your old handsome dog giving support.
there she is! really quick project. i love that is can be changed out easily- glitter snowflakes, silk flowers, peacock feathers, an initial.... endless possibilities.
i used that chevron fabric to stick in a few loops here and there. not even secured very well- i can pull them right out when i'm ready to update for Christmas. (which i totally am already, but restraining until after turkey day....)
i need to be sure to thank my supporting cast members who all diligently gathered around and got under my feet and all twisted up in burlap. thanks for letting me indulge in a quick project, everyone....
Wednesday, November 7, 2012
october package pals
doesn't take much to get me in the mood for fun mail!
i participated in jamie's package pals for the month of october.
we signed up back in september and i was placed with my partner, tanyia of domestic deficit disorder. if you wanna laugh, or see some awesome quilty goodness or fantastic digital scrapbooking, head on over! she's too cute!
anyway- when my package landed on my doorstep, i was upstairs getting the girls to sleep for a nap. i could hardly contain myself to wait until they were asleep before sneaking downstairs to open my gift!
tanyia was so generous and must have given a lot of thought to my gifts- especially making sure they would be fun for the chicks!
WHAT I GOT....
wooden ornaments for painting, jingle bells, pompoms, pinecones, stickers, glitter glue, yarn, candles. SO FUN! the ornament painting will be such a fun activity for our advent calendar. the girls will LOVE it.
again, must know about my sweet tooth.... yum.
and then THIS made me gasp out loud!! see, i told you she was so talented- she made me my own mini-quilt!! i can't believe she went to so much work for lil old me- but boy, do i LOVE it!! it's beautiful and so well made. THANK YOU, TANYIA!
WHAT I GAVE....
of course, i took until the very last minute to get that package to the post office. procrastinating!!
here's what i sent to tanyia:
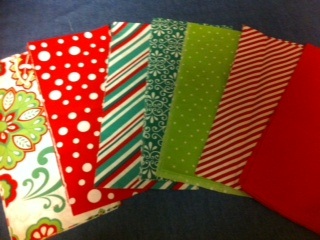
some holidayish/ candy fabric (maybe these are called fat quarters?? clueless)
rainbow of embroidery thread for friendship bracelets with her cute daughters
some scalloped scissors, a cutting mat and a diamond template for quilting
and Christmas stickers, ribbon and laminate samples for a diy i'll feature tomorrow.
what a fun thing to do!! if you've never participated in a swap, give it a shot! it's a lot of fun to meet a fellow crafter! thanks so much tanyia and also to jamie for coordinating!
i participated in jamie's package pals for the month of october.
we signed up back in september and i was placed with my partner, tanyia of domestic deficit disorder. if you wanna laugh, or see some awesome quilty goodness or fantastic digital scrapbooking, head on over! she's too cute!
anyway- when my package landed on my doorstep, i was upstairs getting the girls to sleep for a nap. i could hardly contain myself to wait until they were asleep before sneaking downstairs to open my gift!
tanyia was so generous and must have given a lot of thought to my gifts- especially making sure they would be fun for the chicks!
WHAT I GOT....
wooden ornaments for painting, jingle bells, pompoms, pinecones, stickers, glitter glue, yarn, candles. SO FUN! the ornament painting will be such a fun activity for our advent calendar. the girls will LOVE it.
again, must know about my sweet tooth.... yum.
and then THIS made me gasp out loud!! see, i told you she was so talented- she made me my own mini-quilt!! i can't believe she went to so much work for lil old me- but boy, do i LOVE it!! it's beautiful and so well made. THANK YOU, TANYIA!
WHAT I GAVE....
of course, i took until the very last minute to get that package to the post office. procrastinating!!
here's what i sent to tanyia:
some holidayish/ candy fabric (maybe these are called fat quarters?? clueless)
rainbow of embroidery thread for friendship bracelets with her cute daughters
some scalloped scissors, a cutting mat and a diamond template for quilting
what a fun thing to do!! if you've never participated in a swap, give it a shot! it's a lot of fun to meet a fellow crafter! thanks so much tanyia and also to jamie for coordinating!
Wednesday, May 2, 2012
package pals
i tell ya- I LOVE getting mail!
magazines, catalogs, and especially a package just for me!!
i signed up for package pals from blogger Jamie at C.R.A.F.T. it sounded like just my thing- create a box of crafty fun for someone else and they'll send one to me! perfect!
i was matched up with carrie at my favorite finds. what a cute blog!! you'll have to stop by and take a look! i got her package first- of course. (the post office is one of my LEAST favorite places in the world... two toddlers in tow and our small town only ever has one line open AND a whole card display next to the lines.... ) i literally squealed when i opened it up. SUCH cute stuff. she sent us tulle to make tutus, letters for the chickies (H & M) and glitter paper. perfect picks for me.
we've made the tutus- pics to come- and the other projects are waiting for a rainy day. or maybe when the hubs is fishing....
here's my fun box:
thanks, carrie! i loved making the tutus and my chicks love wearing them. you should have seen us at home depot. the tulle was spilling out of our racecar basket and the little chicks were in tutu heaven! :) i'll just say a tutu plus a little girl who loves to use the big potty all by herself is quite an adventure!!
i love how the alternating colors on the waistband look....
meanwhile... here's what i'm working on these days.
i've been cleaning out the storage rooms and closets and attics of a HUGE quilting fanatic. can we say TONS AND TONS of fabric. i've been rolling (and rolling and rolling and rolling) fabric rolls and sorting them in sizes of small, medium and large rolls and sticking colored tape on them. there were 21 large storage bins of these, people!! then i sorted thread and ribbon and scissors and quilting templates and batting and bobbins and quilting books. lots of tools. and patterns. and sewing machines. it's incredible.
this saturday, my town is hosting quiltfest, an event where you can display your quilts and meet other quilters. and i'm selling my merchandise. woohoo! it will be good to get it gone and hopefully into the hands of others who can use it. because, to be honest, if i sock into MY personal craft collection any more scissors or rolls of ribbon or pretty thread or fabric, we won't have room to move!! :)
here's what my pile to load into the truck looks like. that's almost all fabric- 19 boxes of fabric!! Whew!
wish me luck! and if you're in the boerne area, please come shop!
Wednesday, November 30, 2011
Christmas pockets
Advent Calendar (or what we're calling the "Christmas pockets")
In keeping with tradition, I had to have an advent calendar. My mom had one. Hers was from the Current catalog, and she probably might have picked something a little more substantial if she realized how long she would be doing it. It was a chimney and the bricks were made of 24 little paper boxes. Every day, a box was opened and something fun was inside. Christmas socks, candy, a note that hinted to a fun adventure later that day. Since there were 4 kids, we each opened our own box every 4 days. And maybe, just maybe, there were some occasions when Mason and I slid out the boxes to snoop at our upcoming surprise. Mom was sneakier. She didn't do anything the until the night before. (Of course now I see that she just probably had one day at a time figured out- just like me.) We looooved our "boxes" and Mom even continued the boxes while I was in college- either mailing me little gifts or waiting until I came home from break and having a bunch of days for me all in a row. Eventually, we all got older and moved out (and in some cases, moved back) and the boxes got put away. Those little things were squashed and torn and had been loved for years!
I knew I had to have an advent calendar. And there were some precious ones out there!! Pottery Barn had an adorable one a few years back. I was going to make one out of little boxes and magnetize them and have a cookie sheet... Big plans. But with have two littles under 2 and didn't have the motivation/time/energy. Thanks to Pinterest, I was already defeated before beginning- too much inspiration!! :)
During Thanksgiving, my sister, Molly, insisted we make one. We went to Micheal's, picked out the fabric and stayed up late making it a couple of nights. Turned out pretty cute!
Basic steps- sorry, no great tutorial. Uploading pics is taking FOREVER!!! You need to know that we love to craft but our sewing skills, measurement skills- heck, most everything needs work. Our mantra was "That's fine." So- for all you Anal Annies, or Perfectionist Paulas- you might want to skip my directions. (Eww- Anal Annies sounds so gross.)
1. Buy a variety of fabrics. You'll need about a yard for the background and 6-8 different fabrics. The least Micheals will let you cut is 1/8 of a yard, which is enough for 3 or 4 pockets. Our fabric total was about 10 bucks because most was on sale. Most of the patterned fabrics were 44 cents!! The denim background only cost 99 cents, which HAD to have been a mistake but there were 8 people in line for Blanca to cut their fabrics after me, including one VERY serious quilter, and I didn't want to make anyone mad.
2. Iron your fabrics and make the little pockets. I used a piece of cardboard to make sure they were all the same size. We ironed inside out and then folded the top flaps down. The just used the sewing machine to hem the front and back and then zipped right up the sides. Very simple pockets.
3. Lay out all the pockets in the order you want them.... This was kinda like one of those move-one-square-at-a-time puzzles until the picture is finished. Super frustrating to me, because I would get it all arranged and then step back and have a row of all polka dots.
4. Pin the background to fit with some space around the pockets and hem it up.
5. We added ribbon to the tops of all the pockets. We used fabric glue right on top of the stitching in the front and wrapped it around the back, pinning it until it was dry.
6. The pockets were just tacked on in the top right and top left corners. We figured that was so they could hold something bigger without as much bulging. Plus, it was 11:30 and we wanted to go to Black Friday sales at Wal-mart. Big mistake. Crazyville.
5. I made little tags using my Silhouette machine. Cut out the numbers using the font Impervious onto glittery green vinyl. I cut the circle tags with the machine, too. I used a red stamp pad to make a ring around the tags and added the numbers to each one. (I used Press-N-Seal to transfer my vinyl- it worked great! ) Punch a hole, string it up with yarn. Tada!
6. I just pinned the tags on the inside of the pockets with safety pins. For one, I'm not crazy about the tags and if I'm out to Micheal's or Hobby Lobby, I'm going to look for something I like more. Just couldn't make myself drive into SA just for tags.... I also added some ribbon at the top, but don't love it, either.... A work in progress.

Basically, I had to get it up and finished because we start it tomorrow. I have already learned I need to have it up higher. Pocket 23 is full of raisins and #19 is holding Barbie's shoes. I like that I can add more to it later- thinking ric-rac and jingle bells.
Love it for now. And especially love that it's finished.
In keeping with tradition, I had to have an advent calendar. My mom had one. Hers was from the Current catalog, and she probably might have picked something a little more substantial if she realized how long she would be doing it. It was a chimney and the bricks were made of 24 little paper boxes. Every day, a box was opened and something fun was inside. Christmas socks, candy, a note that hinted to a fun adventure later that day. Since there were 4 kids, we each opened our own box every 4 days. And maybe, just maybe, there were some occasions when Mason and I slid out the boxes to snoop at our upcoming surprise. Mom was sneakier. She didn't do anything the until the night before. (Of course now I see that she just probably had one day at a time figured out- just like me.) We looooved our "boxes" and Mom even continued the boxes while I was in college- either mailing me little gifts or waiting until I came home from break and having a bunch of days for me all in a row. Eventually, we all got older and moved out (and in some cases, moved back) and the boxes got put away. Those little things were squashed and torn and had been loved for years!
I knew I had to have an advent calendar. And there were some precious ones out there!! Pottery Barn had an adorable one a few years back. I was going to make one out of little boxes and magnetize them and have a cookie sheet... Big plans. But with have two littles under 2 and didn't have the motivation/time/energy. Thanks to Pinterest, I was already defeated before beginning- too much inspiration!! :)
During Thanksgiving, my sister, Molly, insisted we make one. We went to Micheal's, picked out the fabric and stayed up late making it a couple of nights. Turned out pretty cute!
Basic steps- sorry, no great tutorial. Uploading pics is taking FOREVER!!! You need to know that we love to craft but our sewing skills, measurement skills- heck, most everything needs work. Our mantra was "That's fine." So- for all you Anal Annies, or Perfectionist Paulas- you might want to skip my directions. (Eww- Anal Annies sounds so gross.)
1. Buy a variety of fabrics. You'll need about a yard for the background and 6-8 different fabrics. The least Micheals will let you cut is 1/8 of a yard, which is enough for 3 or 4 pockets. Our fabric total was about 10 bucks because most was on sale. Most of the patterned fabrics were 44 cents!! The denim background only cost 99 cents, which HAD to have been a mistake but there were 8 people in line for Blanca to cut their fabrics after me, including one VERY serious quilter, and I didn't want to make anyone mad.
3. Lay out all the pockets in the order you want them.... This was kinda like one of those move-one-square-at-a-time puzzles until the picture is finished. Super frustrating to me, because I would get it all arranged and then step back and have a row of all polka dots.
4. Pin the background to fit with some space around the pockets and hem it up.
5. We added ribbon to the tops of all the pockets. We used fabric glue right on top of the stitching in the front and wrapped it around the back, pinning it until it was dry.
6. The pockets were just tacked on in the top right and top left corners. We figured that was so they could hold something bigger without as much bulging. Plus, it was 11:30 and we wanted to go to Black Friday sales at Wal-mart. Big mistake. Crazyville.
5. I made little tags using my Silhouette machine. Cut out the numbers using the font Impervious onto glittery green vinyl. I cut the circle tags with the machine, too. I used a red stamp pad to make a ring around the tags and added the numbers to each one. (I used Press-N-Seal to transfer my vinyl- it worked great! ) Punch a hole, string it up with yarn. Tada!
6. I just pinned the tags on the inside of the pockets with safety pins. For one, I'm not crazy about the tags and if I'm out to Micheal's or Hobby Lobby, I'm going to look for something I like more. Just couldn't make myself drive into SA just for tags.... I also added some ribbon at the top, but don't love it, either.... A work in progress.
Basically, I had to get it up and finished because we start it tomorrow. I have already learned I need to have it up higher. Pocket 23 is full of raisins and #19 is holding Barbie's shoes. I like that I can add more to it later- thinking ric-rac and jingle bells.
Love it for now. And especially love that it's finished.
Subscribe to:
Posts (Atom)