UPDATE: Hate when I realize a month later that I've typed a post and not posted it or ever remembered that I typed it at all. This one should just go down as long and boring now that I reread it. Oh well. It's done and it makes me look like I actually keep up with the blog a little bit more. ;)
This year, to be economical as well as thoughtful, I made many of our Christmas gifts. I'm from a family of 4 as well as my husband and we also have 14 nieces and nephews! And grandparents and tutoring students- just makes for a lot of gifts!For my tutoring students, I made personalized clipboards. These turned out great and didn't take much work at all. I spray painted the clipboards purple and then cut out the names with yellow vinyl using my Silhouette. Then I sprayed a coat of glaze/spray lacquer on the clipboards and while it was still wet, sprinkled glitter from about 4 feet above so it would land randomly. I think they're precious and my 10 year old girls loved them!  This gift was one of Henley's "pocket gifts" this year. A Christmas tree shirt. Just cut out a tree, used Heat-N-Bond to make it sticky. Ironed that on, the got to using the sewing machine to sew on the tree. Whew- that was TOUGH! Haven't figured out how to sew backwards or just turn off the feed dog (the thing that automatically pulls the fabric forward?) so I did a lot of using the backwards stitch feature. Then I sewed on a couple red/brass buttons with gold thread. Cute, huh? [Totally being lazy by not re-uploading this picture rotated correctly.]
 My dad, also known as Pop around these parts, is a meticulous breakfast eater. A bowl of cereal, an orange, a banana, a cup of coffee- probably in that same order, every day, always, always. He eats at the same spot at the table with a dishtowel in his lap. We made him some dishtowels to make each day great. I cut each design out with the Silhouette and weeded out the actual design so the outside was left. Then I stuck that on some flour sack towels from Walmart and painted a base coat over it. Left it to dry mostly and then, Henley came along and painted over it. Mostly it just added color to the base color. Looks cute and she loved helping. We did the design on both ends of the dish cloth and then I sewed another layer to make it sturdier with a zigzag stitch.
  This project is the most sentimental one for me. I had worked and worked up to the last minute to give this to my mother-in-law who ADORED her grandkids. She has my 2, two adopted from Russia from another family and 3 biological and 6 adopted and one in heaven and 2 more on the way from Ukraine from another family. Whew- that's a bunch. I made this from Pinterest inspiration but knew I would have to modify because of the number of kiddos! I painted a canvas green and waited for that to dry overnight. I cut the letters out with vinyl and applied them. Then I sprayed the whole thing generously with spray glaze. I was worried- the spray clouded up and it looked like i had ruined it but it dried clear. I took 20 clothespins- we could be adding more, right? And I glued buttons and scrapbook paper and ricrac and gold glitter glue on them. Then I glued the clothespins on with E6000 glue. It turned out really cute. So sad that she never saw it- she passed away the night before Christmas Eve. We ended up using at the memorial service and people loved looking at all the adorable kids on it. It hangs at the family ranch now and will be something special for me to remember her legacy everytime I look at it. I know she would have LOVED it.
Advent Calendar (or what we're calling the "Christmas pockets")In keeping with tradition, I had to have an advent calendar. My mom had one. Hers was from the Current catalog, and she probably might have picked something a little more substantial if she realized how long she would be doing it. It was a chimney and the bricks were made of 24 little paper boxes. Every day, a box was opened and something fun was inside. Christmas socks, candy, a note that hinted to a fun adventure later that day. Since there were 4 kids, we each opened our own box every 4 days. And maybe, just maybe, there were some occasions when Mason and I slid out the boxes to snoop at our upcoming surprise. Mom was sneakier. She didn't do anything the until the night before. (Of course now I see that she just probably had one day at a time figured out- just like me.) We looooved our "boxes" and Mom even continued the boxes while I was in college- either mailing me little gifts or waiting until I came home from break and having a bunch of days for me all in a row. Eventually, we all got older and moved out (and in some cases, moved back) and the boxes got put away. Those little things were squashed and torn and had been loved for years!I knew I had to have an advent calendar. And there were some precious ones out there!! Pottery Barn had an adorable one a few years back. I was going to make one out of little boxes and magnetize them and have a cookie sheet... Big plans. But with have two littles under 2 and didn't have the motivation/time/energy. Thanks to Pinterest, I was already defeated before beginning- too much inspiration!! :)
During Thanksgiving, my sister, Molly, insisted we make one. We went to Micheal's, picked out the fabric and stayed up late making it a couple of nights. Turned out pretty cute!Basic steps- sorry, no great tutorial. Uploading pics is taking FOREVER!!! You need to know that we love to craft but our sewing skills, measurement skills- heck, most everything needs work. Our mantra was "That's fine." So- for all you Anal Annies, or Perfectionist Paulas- you might want to skip my directions. (Eww- Anal Annies sounds so gross.)
1. Buy a variety of fabrics. You'll need about a yard for the background and 6-8 different fabrics. The least Micheals will let you cut is 1/8 of a yard, which is enough for 3 or 4 pockets. Our fabric total was about 10 bucks because most was on sale. Most of the patterned fabrics were 44 cents!! The denim background only cost 99 cents, which HAD to have been a mistake but there were 8 people in line for Blanca to cut their fabrics after me, including one VERY serious quilter, and I didn't want to make anyone mad.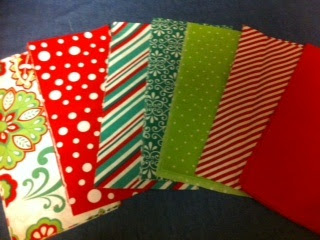 2. Iron your fabrics and make the little pockets. I used a piece of cardboard to make sure they were all the same size. We ironed inside out and then folded the top flaps down. The just used the sewing machine to hem the front and back and then zipped right up the sides. Very simple pockets.3. Lay out all the pockets in the order you want them.... This was kinda like one of those move-one-square-at-a-time puzzles until the picture is finished. Super frustrating to me, because I would get it all arranged and then step back and have a row of all polka dots.
4. Pin the background to fit with some space around the pockets and hem it up.5. We added ribbon to the tops of all the pockets. We used fabric glue right on top of the stitching in the front and wrapped it around the back, pinning it until it was dry.6. The pockets were just tacked on in the top right and top left corners. We figured that was so they could hold something bigger without as much bulging. Plus, it was 11:30 and we wanted to go to Black Friday sales at Wal-mart. Big mistake. Crazyville.5. I made little tags using my Silhouette machine. Cut out the numbers using the font Impervious onto glittery green vinyl. I cut the circle tags with the machine, too. I used a red stamp pad to make a ring around the tags and added the numbers to each one. (I used Press-N-Seal to transfer my vinyl- it worked great! ) Punch a hole, string it up with yarn. Tada! 

6. I just pinned the tags on the inside of the pockets with safety pins. For one, I'm not crazy about the tags and if I'm out to Micheal's or Hobby Lobby, I'm going to look for something I like more. Just couldn't make myself drive into SA just for tags.... I also added some ribbon at the top, but don't love it, either.... A work in progress.

Basically, I had to get it up and finished because we start it tomorrow. I have already learned I need to have it up higher. Pocket 23 is full of raisins and #19 is holding Barbie's shoes. I like that I can add more to it later- thinking ric-rac and jingle bells.Love it for now. And especially love that it's finished.
I think I figured out a few reasons why I feel like writing on my blog.
1. This whole staying at home and talking just to my kids 95% of the time leaves me having LOTS of little conversations in my head. Or I go to Wal-mart or the playground and talk a little tooo much (aka, I'm the psycho-starved-for-conversation mom) to complete strangers. Better to type them to no one than have them with random people.
2. My poor sister has to remind me to send a text with pics of the chickies- she's dying to see what's up with them and what kind of crazy notions they get into.
3. I like to document my little projects I work on at naptime or after bedtime.
There. And if no one is reading, it's ok. Just for me. And my sanity.
Here's a little naptime project from yesterday. I needed a little visual reminder right in front of my sink. Sometimes, I'm washing bottles and cleaning up from dinner and I get to staring out the window, having a huge grouch-fest in my brain.
"Why am I the only one around here who washes the bottles?"
"If I load the dishwasher, couldn't someone else unload it?"
"Why can't Mia drink 3 10 ounce bottles instead of 6 5 ounce bottles?"
And on and on. Some days I'm in a good mood- husband brought me gorgeous pink roses, potty training went great all day, scored some cool finds for 10 bucks-and the grouching isn't so bad.
AND come on- I'm a stay at home mom! I live in a comfy house near family and friends! I had a delish dinner! My babies are in their beds, safe and happy and healthy with full bellies to sleep a good night's sleep. My life is so wonderful. But those dishes just get me.
This is what I made to help me remember. I finally bought some vinyl to play with on my Silhouette. Oh, how much fun it is! Basically, I'm just learning the ropes right now. This was going to be on a plate but I messed up the actual vinyl letters and decided to use the surrounding vinyl as a stencil.
Basically, 3 steps.
1. Stuck the vinyl to the window. Smoothed out as much air as possible. [NOTE: I am in no way a perfectionist. I am a get-it-done kind of girl. My projects do reflect this quality of myself. I realize this and move on. Hope you can, too.] I also had to stick on the circles and ovals in the O, B, E and G.

2. Painted with yellow acrylic paint over the stencil. I did two layers.

3. Peeled off the vinyl. I freaked a little because paint seeped under the vinyl and it looked a mess, but by using a toothpick, I was able to scape it off really easily. I cleaned it up and was left with this.

I like it because it will remind me how blessed I am and to quit griping in my head about the stinkin' (literally) bottles. And when I get sick of it, it will easily scrape off. Love. I plan to put one on the bathroom mirrors too. And yes, it is backward when you look at the window from outside. I don't care. I'm such a rebel. ;)


